Build a fanless low power home server
For various rational and irrational reasons I decided I needed to upgrade my current home server consisting of a Raspberry Pi 3B. Its job was to host a couple of services running in docker containers including a PostgreSQL database.
Usually services hosted in docker containers take a slight performance hit due to overhead and usually you do not really notice it as long as you are running it on reasonably sized hardware. It does not take much however with a PostgreSQL database I started to notice a little bit of lag when retrieving data from it.
Components
That is where I decided to upgrade to a more powerful but still low power and silent home server that can run 24/7 without drawing too much power. The components I picked are the following:
- Crucial MX500 250GB, SATA
- Crucial SO-DIMM Kit 8GB, DDR4-2400, CL17-17-17
- ASRock J4105-ITX
- Chieftec Compact IX-01B
- Mini-Box PicoPSU-90, 90W
- Chieftec IX-01B-OP Compact
- MeanWell GST90A12
I paid about 200 € in total for these components which seems like a fair price to me. Surely you could also use this build as a office PC or even as a HTPC.
The ASRock J4105-ITX is a processor/mainboard combo which means the processor is already baked onto the mainboard. As it is not a socketed CPU you cannot upgrade it. This imposes the risk of having to replace both mainboard and CPU once either of them goes bad. Also I would like to point out that I initially wanted to build a AMD based server but unfortunately at this current time AMD does not offer comparable CPUs.
The Intel Celeron J4105 was introduced 2017 and it is a 10 Watt Quad-Core CPU based on the 14 Nm Gemini Lake Architecture that can boost from 1500 – 2500 MHz, the latter only on a single core.
The Build
After having received all the components I started to plan the build. It was not as straight forward as I wanted it to be but in the end it turned out nicely.
Lets start with the case. As this case is pretty small things start to get a little bit tricky at times. Disassemble it completely in order to get started.
Take the mainboard, connect the picopsu to the mainboard.
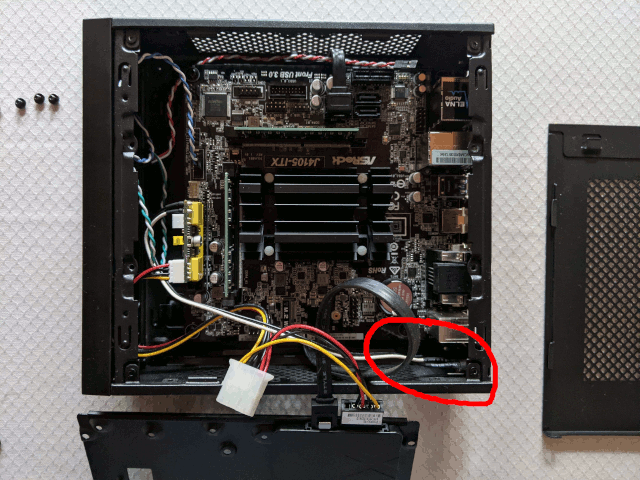
If you have a somewhat long SATA cable you can connect it to a SATA port and lead the cable behind the mainboard (see picture below).
Then place the mainboard inside the case and screw it down.
Then connect the power button from the case to the mainboard and if you need it also connect the power LED. I chose not to since I do not really need it.
Also put the memory stick into its slot and make sure it is locked.

Run the cables coming from the picopsu as shown in the picture above/below. Take out the screw at the back of the case and connect it with the power connector.
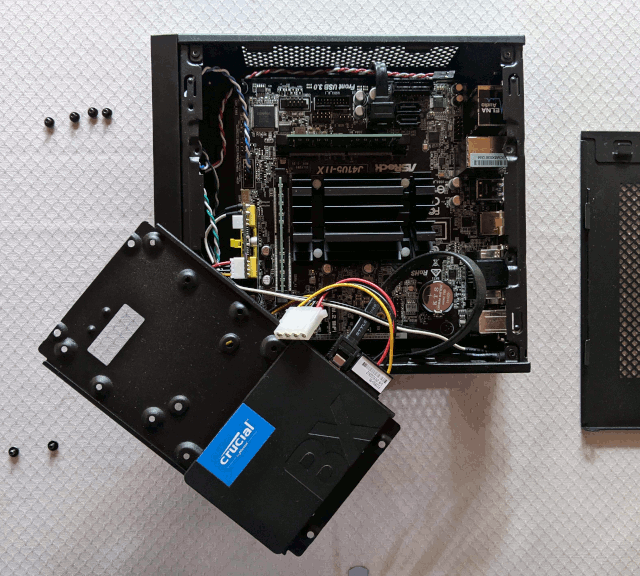
Next, connect the SSD and secure it with 4 screws to the top cover, connect power and SATA as seen below.
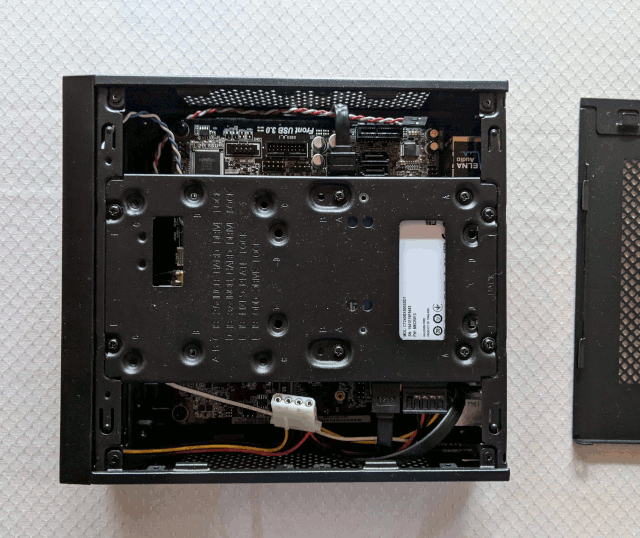
And then put on the panels to the case again and we are finished!
First Boot
Since this configuration is meant to be headless I decided to run Ubuntu Server 20.04 on it. Installing it was fairly easy. To create a bootable USB-Stick I used a built-in utility in Linux Mint called “USB Image Writer”.
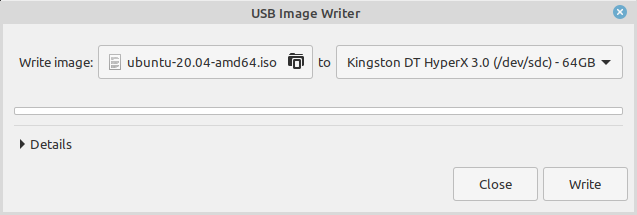
All you need to do is to download Ubuntu Server 20.04 from their Website and choose the downloaded image in the Image Writer and choose the correct USB drive next to it and click on “Write”. Or, if you want to do it the terminal way, you could use dd to create the bootable USB drive:
dd bs=4M if=<ubuntu-server.img> of=/mnt/<path-to-usb-drive>
Be very careful with this command, as choosing the wrong drive will override your data!
Then plug in a keyboard as well as the just created USB drive, also a monitor and let’s press the power button. Press DEL on the keyboard until you see the BIOS screen.
Go to the "Boot" page and choose to boot the USB drive. And here we are on the first page of the Ubuntu Server Installation guide. I chose not to repeat the steps I made here as Ubuntu has a perfect tutorial themselves.
After completion of the setup reboot and you should find yourself on the command line. First things I usually do on a newly installed system is to update all packages to its newest versions like below:
1sudo apt update
2sudo apt upgrade
Now you are ready to install whatever services you want to run on your server!
Power and Heat
This thing absolutely sips power and keeps cool.
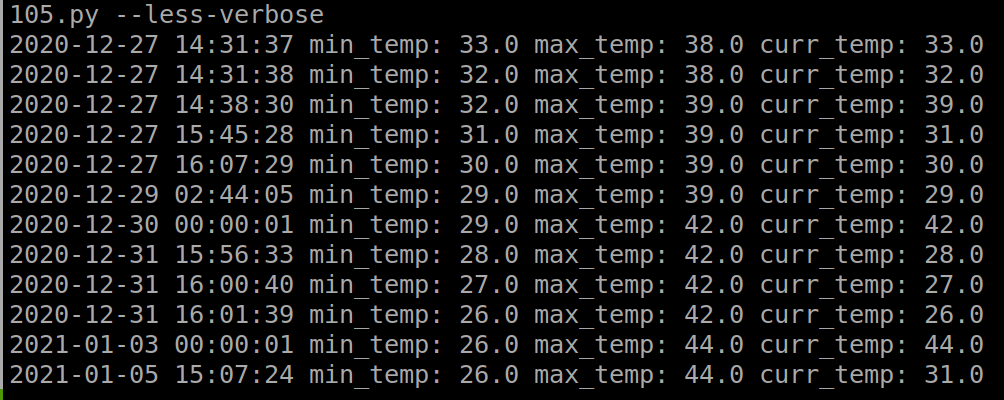
The passive cooler on the J4105 is reasonably sized and it is able to keep the J4105 below 60°C in most cases under normal home server workload (mostly idle). If you start stressing the CPU with benchmarks temperature may increase to over 70°C as shown below.
stress-ng --cpu 4 --timeout 10m --metrics-brief

Your mileage may vary depending on room temperature and also whether you are using it as a HTPC with heavy GPU transcoding but I still believe it can do the job without throttling. If you run workloads with continuous and maxed out utilization on the CPU I would suggest installing a case fan or think about using a actively cooled CPU.
Unfortunately I cannot provide any statistics on power usage since I do not own one of those power meters. I am going to update this post once I can get my hands on one of them. However it is reported from other reviews that at full load the system draws about 20 Watts and around 8 Watts on idle.
Performance
Now I use this server to host some self-written docker containers (8 in total), as a build server, as my DNS Server (PiHole) and I am sure I could still throw more at it. I am very happy about its performance especially given to what I paid for it.
Some might say 8 GB of memory is not enough for them and officially the J4105 only supports 8 GB however people have reported to successfully run 16 or even 32 GB of memory with this board.
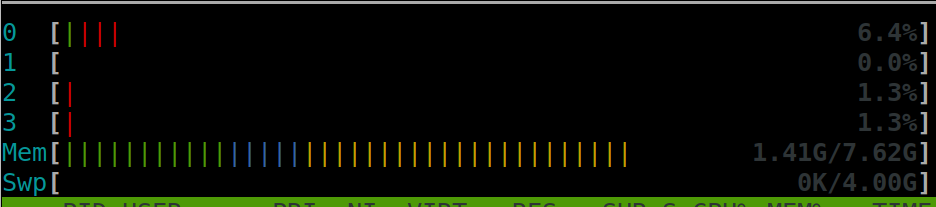
This is what htop shows most of the time for my use case. 1.41 GB memory is used + around 3.5 GB cached.
As a quick comparison to my Raspberry Pi 3B as well as my work laptop I ran a couple of benchmarks on both systems to show performance differences. See the commands below.
sysbench --num-threads=<threads> --test=cpu --cpu-max-prime=20000 run
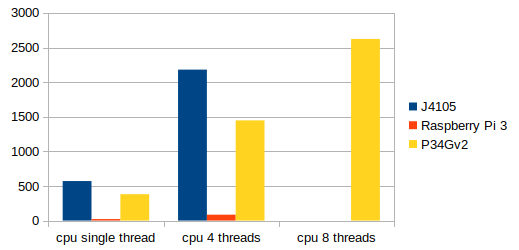
Surprisingly the J4105 outnumbers the Intel Core i7 4710HQ found in my P34Gv2 in the single and 4 thread CPU benchmark. This is due to the performance gains in the newer architecture (Gemini Lake vs. Haswell)
sysbench --num-threads=<threads> --test=memory --memory-block-size=1M --memory-total-size=100G run
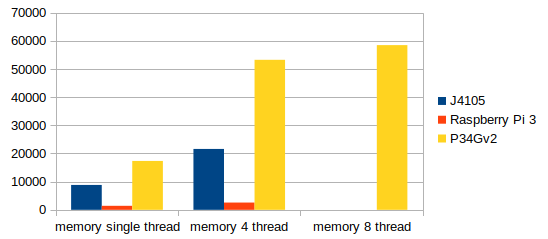
It clearly falls short on the memory benchmark compared to the P34Gv2 due to the single memory stick.
dd if=/dev/zero of=./test.file bs=1M count=10000 oflag=direct
dd if=./test.file of=/dev/null bs=1M count=10000
fio --name TEST --eta-newline=5s --filename=fio-tempfile.dat --rw=randread --size=500m --io_size=10g --blocksize=4k --ioengine=libaio --fsync=1 --iodepth=1 --direct=1 --numjobs=1 --runtime=60 --group_reporting
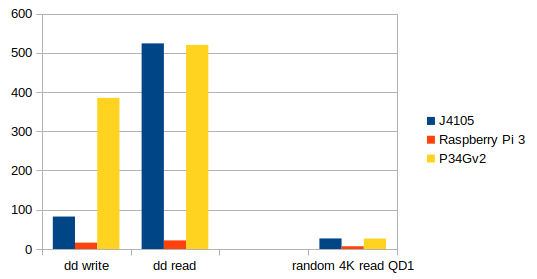
Also the SSD is not quite as fast in writing.
However it shines compared to basically all Raspberry Pi 3B benchmarks.
Conclusion
I like this build a lot. Using it to host services like nextcloud or pihole silently without using much power and without generating much heat while being faster than a Raspberry Pi 3B makes for the perfect home server.
As long as you do not run workloads that require the CPU to be pegged at 100% all the time you are not going to experience any thermal issues. It has plenty of resources left for many more services than I would require for it to run. Besides that I am certain that this build would also perform well as a office pc or HTPC. The GPU is quite powerful and efficient for transcoding and watching high quality content since it has a built-in HEVC encoder. A clear recommendation for everyone looking for a powerful, silent and cheap home server.
If you would like to request more information or would like to see specific benchmarks do not hesitate and contact me at garystechblog@gmail.com